
One post tagged with "Welcome"

View All Tags

· One min read

IvorySQL can be built on Linux, OSX, Unix, and Windows platforms, and is basically the same as PostgreSQL compiled and installed. This article describes the steps for compiling source code on a Linux-based system.

Preparation

1.1 Obtaining the IvorySQL source code

For Windows or Linux, if you have Git installed, you can use git to download:

git clone https://github.com/IvorySQL/IvorySQL.git

git clone https://gitee.com/IvorySQL/IvorySQL.git

Or go directly to Github or Gitee to download:

https://github.com/IvorySQL/IvorySQL

https://gitee.com/IvorySQL/IvorySQL

Github can be a bit slow, use it if it works, and switch to Gitee if it doesn't.

As of this writing, the latest release of IvorySQL is 1.2, released on February 28, 2022.

L

The source version used in this article is also IvorySQL 1.2.

1.2 Installing the dependency packages

To compile IvorySQL from source, you must ensure that a prerequisite packages are available on your system.

Run the following command to install related packages:

sudo yum install -y bison-devel readline-devel zlib-devel openssl-devel wget
sudo yum groupinstall -y 'Development Tools'

Note: "Development Tools" includes GCC, make, Flex, bison.

Compilation and installation

The source code obtained in front of the folder IvorySQL, next we will enter this folder for operation.

2.1 configuration

Run the following command as the Root user:

./configure

Note: Since --prefix is not provided, /usr/local/pgSQL will be used as default installation path.

To use a different installation path, such as "/ usr/local/ivorysql/ivorysql - 1.2" :

./configure --prefix=/usr/local/ivorysql/ivorysql-1.2

For more configure parameters, try ./configure --help. Also check out the PostgreSQL manual.

2.2 Compilation and Installation

After the configuration is complete, run make to compile:

make

To test the newly compiled service using regression tests before installing it, use either of the following commands:

make check
make check-world

Then install:

make install

Initialize the database service

We only have a simple configuration here, can be local and remote connection is ok.

3.1 Creating an OS User

In the root session, create user ivorysql:

/usr/sbin/groupadd ivorysql
/usr/sbin/useradd -g ivorysql ivorysql -c "IvorySQL1.2 Server"
passwd ivorysql

3.2 Creating a Data Directory

Next you need to create the data directory and change the permissions. Run the following command in the root session.

mkdir -p /ivorysql/1.2/data
chown -R ivorysql.ivorysql /ivorysql/1.2/

**Note: The data directory is not placed in "/var/lib/ivorysql/ivorysql-1/data" when you do installation using the RPMs.

3.3 Environment Variables

Switch to ivorysql user, modify the /home/ivorysqL/. bash_profile file, and configure environment variables:

umask 022
export LD_LIBRARY_PATH=/usr/local/pgsql/lib:$LD_LIBRARY_PATH
export PATH=/usr/local/pgsql/bin:$PATH
export PGDATA=/ivorysql/1.2/data

Make environment variables take effect in the current IVorysQL user session:

source .bash_profile

You can also log in again or start a session with a new user ivorysQL.

3.4 Configuring the Firewall

If the firewall is enabled, port 5333 needs to be opened:

firewall-cmd --zone=public --add-port=5333/tcp --permanent
firewall-cmd --reload

Note: The default port is 5333. If this port is disabled, external clients will not be able to connect to the IP address.

3.5 the initialization

In user ivorysql, simply execute initdb to complete the initialization:

initdb

Note: InitDB operates in the same way as PostgreSQL, and can be initialized in the same way as PG.

3.6 Starting the Database

Use pg_ctl to start the database service:

pg_ctl start

Check the status, the startup is successful:

pg_ctl status

pg_ctl: server is running (PID: 29549)

/usr/local/pgsql/bin/postgres

Configure services

Here is a simple configuration, can be local and remote connection is ok

4.1 Client Authentication

Add the following information to /ivorysql/1.2/data/pg_hba.conf:

host    all             all             0.0.0.0/0               trust

Note: this is trust, which means you can log in without secret.

Run the following command to load the configuration:

pg_ctl reload

4.2 Basic Parameters

Connect to database through PSQL:

psql

Modify listening address:

alter system set listen_addresses = '*';

Note: By default the server does not allow connections from external hosts.

Restart the service for the Settings to take effect:

pg_ctl restart

4.3 Daemon Service

Create service file:

touch /usr/lib/systemd/system/ivorysql.service

The edited content is as follows:

[Unit]
Description=IvorySQL 1.2 database server
Documentation=https://www.ivorysql.org
Requires=network.target local-fs.target
After=network.target local-fs.target

[Service]
Type=forking

User=ivorysql
Group=ivorysql

Environment=PGDATA=/ivorysql/1.2/data/

OOMScoreAdjust=-1000

ExecStart=/usr/local/pgsql/bin/pg_ctl start -D ${PGDATA}
ExecStop=/usr/local/pgsql/bin/pg_ctl stop -D ${PGDATA}
ExecReload=/usr/local/pgsql/bin/pg_ctl reload -D ${PGDATA}

TimeoutSec=0

[Install]
WantedBy=multi-user.target

Note: There are many ways to write service. Be careful when using it in the production environment. Repeat the test several times.

Stop the database service started by pg_ctl, enable the systemd service, and start:

systemctl enable --now ivorysql.service

IvorSQL Database service operation commands:

systemctl start ivorysql.service            --启动数据库服务
systemctl stop ivorysql.service --停止数据库服务
systemctl restart ivorysql.service --重启数据库
systemctl status ivorysql.service --查看数据库状态
systemctl reload ivorysql.service --可以满足部分数据库配置修改完后生效

Database Client

The IvorySQL client is the same as the PostgreSQL client.

5.1 PSQL connection

Connecting from ivorysql OS user:

[ivorysql@Node02 ~]$ psql
psql (15devel)
Type "help" for help.

ivorysql=#

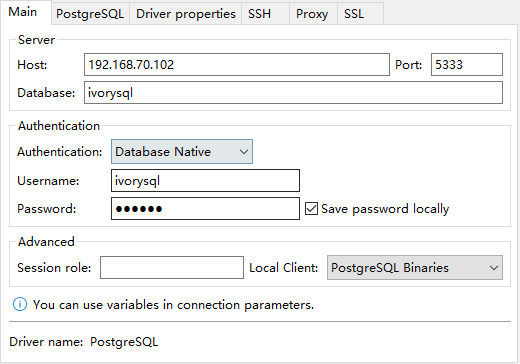
5.2 DBeaver connection

DBeaver is a powerful open source tool with the following connectivity configurations:

L

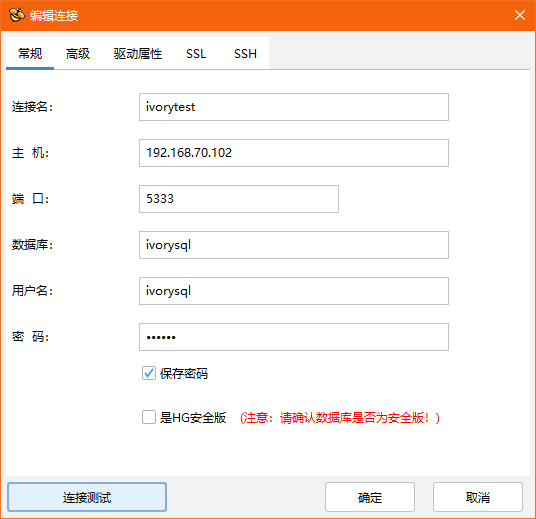
5.3 Connect using HighGo Developer

HighGo Developer is a tool independently developed by Highgo, which supports not only Highgo database, but also PostgreSQL and IvorySQL database. The connection configuration is as follows:

L

Uninstall

If required IvorySQL can be uninstalled by compiling and uninstalling.

6.1 Backing Up Data

The data directory is under "/ ivorysQL /1.2/data", so we can protect the directory, It is recomended to stop the database service and make a backup.

6.2 Compilation and Uninstallation

Switch to the source directory and run the following commands:

make uninstall
make clean

Delete residual directories and files:

systemctl disable ivorysql.servicemake                  --Disable the service
mv /usr/lib/systemd/system/ivorysql.service /tmp/ --delete or move the service file to /tmp
rm -fr /usr/local/pgsql --Remove the installed files

The ivorysql user and the corresponding environment variables can be cleared according to the situation.

The rest is the data directory "/ ivorysQL /1.2/data", please be sure to take a backup before processing.

There are installed dependency packages, you can decide whether to uninstall according to the situation.

Postscript

  • For more detailed operations, see PostgreSQL.

  • You can also refer to the IvorySQL source code under the documentation: /root/ivorysql/readme.md.

  • You can also open a link to the website:

    https://gitee.com/IvorySQL/IvorySQL/blob/master/README.md。

  • If you have any question, welcome to the official community IvorySQL warehouse: github.com/IvorySQL/IvorySQL submit issue.


Join the IvorySQL community by subscribing to mailing lists:

Also, don't forget to give us a ⭐ on Github

· One min read

Install software through the YUM source

This section uses Centos7.9 as an example to show how to install the IvorySQL database. Here is the simplest YUM source installation.

1.1 Installing the YUM Source

Download address: https://yum.highgo.ca/ivorysql.html

Click "DOWNLOAD REPO RPM" to DOWNLOAD ivorysqL-release-1.0-1.noarch. RPM and upload it to Centos7.9:

Y

Or use wget on Centos7 to download:

wget https://yum.highgo.ca/dists/ivorysql-rpms/repo/ivorysql-release-1.0-1.noarch.rpm

Install ivorysql - release - 1.0-1. Noarch. RPM:

rpm -ivh ivorysql-release-1.0-1.noarch.rpm

After installation, will create the YUM source configuration file: / etc/yum.repos. d/ivorysql.repo.

Search to view related installation packages:

yum search ivorysql

The search results are described in Table 1:

Table 1 Description of YUM sources

No.Package NameDescription
1ivorysql1.x86_64IvorySQL client program and library files
2ivorysql1-contrib.x86_64Contributed source code and binaries shipped with IvorySQL
3ivorysql1-devel.x86_64IvorySQL development header files and libraries
4ivorysql1-docs.x86_64Additional documentation for IvorySQL
5ivorysql1-libs.x86_64Shared libraries required by all IvorySQL clients
6ivorysql1-llvmjit.x86_64Instant compilation support for IvorySQL
7ivorysql1-plperl.x86_64Procedure language Perl for IvorySQL
8ivorysql1-plpython3.x86_64The procedure language Python3 for IvorySQL
9ivorysql1-pltcl.x86_64The procedure language Tcl for IvorySQL
10ivorysql1-server.x86_64Create and run programs required by the IvorySQL server
11ivorysql1-test.x86_64Test suite shipped with IvorySQL
12ivorysql-release.noarchHighgo Basic Software Co., LTD. Yum source configuration RPM package

Note: 1, 2, 5, 10 are required for RPM package installation, hyperlinks can be downloaded separately.

1.2 installation IVORYSQL

To install the database service, install ivorysQL1-Server.

Run the following command in the user root session:

yum install -y ivorysql1-server

Installation List:

ivorysql1-server.x86_64 0:1.2-1.rhel7

Dependent installation:

  • ivorysql1.x86_64 0:1.2-1.rhel7 ivorysql1-contrib.x86_64 0:1.2-1.rhel7

  • ivorysql1-libs.x86_64 0:1.2-1.rhel7 libicu.x86_64 0:50.2-4.el7_7

  • libtirpc.x86_64 0:0.2.4-0.16.el7 libxslt.x86_64 0:1.1.28-6.el7

  • python3.x86_64 0:3.6.8-18.el7 python3-libs.x86_64 0:3.6.8-18.el7

  • python3-pip.noarch 0:9.0.3-8.el7 python3-setuptools.noarch 0:39.2.0-10.el7

1.3 Installed Directory

Table 2 describes the file directories generated during the YUM installation process.

Table 2 Installation directory file description

No.File pathDescription
1/usr/local/ivorysql/ivorysql-1Software Installation Directory
2/var/lib/ivorysql/ivorysql-1/dataData directory (default)
3/usr/bin/ivorysql-1-setupHelps system administrators with basic database cluster management
4/usr/lib/systemd/system/ivorysql-1.serviceGuarding services

1.4 RPM installation

RPM installations, by the way, need to be installed in this order:

yum install -y libicu libxslt python3                   --先安装依赖
rpm -ivh ivorysql1-libs-1.2-1.rhel7.x86_64.rpm
rpm -ivh ivorysql1-1.2-1.rhel7.x86_64.rpm
rpm -ivh ivorysql1-contrib-1.2-1.rhel7.x86_64.rpm --nodeps
rpm -ivh ivorysql1-server-1.2-1.rhel7.x86_64.rpm

So, it's quite convenient to install using YUM. If not, download it separately and install it in this order.

Download address: https://yum.highgo.ca/ivorysql.html

Y

Click BROWSE Repository-1 to find the corresponding package to download (note: dependency packages are not available on the website).

Initialize the database

The IvorySQL database is easy to initialize and start or stop by default.

2.1 Default Initialization

To initialize the system, run the following command as user root:

/usr/local/ivorysql/ivorysql-1/bin/ivorysql-1-setup initdb

Note: IvorysQL-1 is read by default because SERVICE_NAME is not provided.

Enable and start the service:

systemctl enable --now ivorysql-1.service

IvorysqL-1-setup

ivorysql-1-setup {initdb|check_upgrade|upgrade} [SERVICE_NAME]

Note: For details about how to use this command, run ivorysqL-1-setup --help.

2.2 Custom Initialization

If we have a requirement to specify the data file path (/ ivorysQL /1.2/data/) and port number (5866), then we can customize the initialization.

According to the default service file "/ usr/lib/systemd/system/ivorysql - 1. The service" in the same directory replication of a new "ivorysql - 5866. The service" :

cp /usr/lib/systemd/system/ivorysql-1.service /usr/lib/systemd/system/ivorysql-5866.service

Modify Add the following information:

Environment=PGDATA=/ivorysql/1.2/data/
Environment=PGPORT=5866

Specify SERVICE_NAME as ivorysQL-5866 to initialize:

/usr/local/ivorysql/ivorysql-1/bin/ivorysql-1-setup initdb ivorysql-5866

Enable and start the service:

systemctl enable --now ivorysql-5866.service

2.3 Common Service Operations

IvorSQL Database service operation commands:

systemctl start ivorysql-1.service              --启动数据库服务
systemctl stop ivorysql-1.service --停止数据库服务
systemctl restart ivorysql-1.service --重启数据库
systemctl status ivorysql-1.service --查看数据库状态
systemctl reload ivorysql-1.service --可以满足部分数据库配置修改完后生效

Configure database services

We only have a simple configuration here, can be local and remote connection is ok

3.1 Client Authentication

Modify the/var/lib/ivorysql/ivorysql - 1 / data/pg_hba. Conf, add the following content:

host    all             all             0.0.0.0/0               scram-sha-256

Run the following command to load the configuration:

systemctl reload ivorysql-1.service

3.2 Basic Parameters

Switch to user ivorysQL:

su - ivorysql

Connect to database through PSQL:

psql

Change ivorysQL password for remote connection:

alter system set listen_addresses = '*';
alter user ivorysql password '666666';

Note: User ivorysQL does not have a password. If you do not change the password, you can change the client authentication mode to Trust to avoid secret login.

Return to user root and restart the service for the Settings to take effect:

systemctl restart ivorysql-1.service

The firewall

If the firewall is enabled, port 5333 needs to be opened:

firewall-cmd --zone=public --add-port=5333/tcp --permanent
firewall-cmd --reload

Note: The default ivorysQL service port is 5333. If this port is disabled, external clients fail to connect to the IVorysQL service through an IP address.

The client connects to the database

The IvorySQL client is the same as the PostgreSQL client.

4.1 PSQL connection

Operating system user IvorysQL session connection:

[root@Node02 ~]# su - ivorysql 
Last login: Wed Apr 27 23:58:57 CST 2022 on pts/0
-bash-4.2$ psql
psql (14.2)
Type "help" for help.

ivorysql=#

4.2 DBeaver connection

DBeaver is a powerful open source tool with the following connectivity configurations:

Y

4.3 Highgo Developer connection

Highgo Developer is a tool independently developed by Highgo, which supports not only Highgo database, but also PostgreSQL and IvorySQL database. The connection configuration is as follows:

Y

Uninstall

Since we installed through yum, it is recommended to use yum to uninstall. Try not to use RPM, which may cause incomplete uninstall. Of course, you can also uninstall it according to the Yum installation list.

5.1 Backing Up Data

Data directory in/var/lib/ivorysql under/data/ivorysql - 1, so we can this directory will be protected, and best to stop the service, do a backup.

5.2 YUM uninstall

Stop the database service first:

systemctl stop ivorysql-1.service

Use the "yum history list" to determine the transaction ID of the yum installation:

[root@Node02 ~]# yum history list
Loaded plugins: fastestmirror
ID | Login user | Date and time | Action(s) | Altered
-------------------------------------------------------------------------------
5 | root <root> | 2022-04-27 12:38 | Install | 11 <
4 | root <root> | 2022-03-26 16:08 | Install | 35 >
3 | root <root> | 2022-03-26 16:07 | I, U | 19
2 | root <root> | 2022-03-26 16:07 | I, U | 73
1 | System <unset> | 2022-03-26 15:59 | Install | 299
history list

You can see that ID 5 is the transaction that performs the installation. Run the following command to uninstall (replace XX with 5) :

yum history undo XX

You can also use the following command to uninstall:

yum remove ivorysql-server

However, the command is not completely uninstalled, only removing two dependencies and failing to remove eight dependencies. You can decide whether to uninstall this way depending on whether to keep these dependencies.

Postscript

  • For more detailed operations, see postgresQL operations. For example, direct initialization with initDB.
  • You can also refer to the IvorySQL documentation:

/usr/share/doc/ivorysqL1-1.2/readme.rpm -dist

  • If you have any question, welcome to the official community IvorySQL warehouse: github.com/IvorySQL/IvorySQL submit issue.

Join the IvorySQL community by subscribing to mailing lists:

Also, don't forget to give us a ⭐ on Github

· One min read

Hello

Just when the world was packing the bags for the holiday season and getting ready to welcome the New year we were hard at work and were giving the final touches to the project that our team was working on since the start of 2021. And it was the 15th of December just before the day end we got all green lights and silently released the very first version of IvorySQL before cleaning up the desk for that day.

IvorySQL at Glance

IvorySQL is Apache 2.0 licensed Open Source Oracle compatible PostgreSQL. The very first release of IvorySQL is derived from PostgreSQL 14 with a firm commitment to always remain 100% compatible and a Drop-in replacement of the latest PostgreSQL.

IvorySQL adds a compatible_db GUC on top of existing standard PostgreSQL configuration parameters. The compatible_db is a toggle switch to switch between Oracle and PostgreSQL compatibility modes. The second major highlight of IvorySQL is PL/iSQL procedural language that supports oracle’s PL/SQL syntax. These two additions sit at the core of Oracle compatibility of IvorySQL without breaking the standard PostgreSQL compatibility. The compatible_db switches the behavior of functions and objects that exist in both Oracle and PostgreSQL and acts differently, while PL/iSQL builds the foundation for running the oracle code on IvorySQL with minimal changes.

IvorySQL comes with numerous Oracle compatibility features including Oracle style PACKAGES, DATA Types, and Conversion Functions. For details of Oracle compatibility features in IvorySQL refer to IvorySQL documentation

We are committed to following the principles of open source way

IvorySQL is committed to abiding by the principles of open-source ways and we strongly believe in building a healthy and inclusive community. We maintain that good ideas can come from anywhere, and the best ideas should win. Only by including diverse perspectives, we can reach to the best decision. While the first version of IvorySQL is mainly focused on Oracle Compatibility features, going forward the future road map and feature set will be determined by the community in an open-source way.

Contributing to the IvorySQL

There are plenty of ways to contribute to IvorySQL. You can contribute by providing the documentation updates, by providing the translations for the documentation. If you have design skills you can contribute to the IvorySQL website project.
Testing the IvorySQL and reporting issues, by issuing pull requests for bug fixes or new features or answering the questions on mailing lists are some ways to contribute to the IvorySQL project and all types of contributions are welcomed and appreciated by the IvorySQL community.

Getting Started

All IvorySQL related projects including database server, website, and documentation are hosted and managed through Github. You can download the source code or released packages and track the current issues, pull requests, and discussions through the IvorySQL Github page.

Visit http://www.ivorysql.org and read the project documentation and contribution guidelines.


Join the IvorySQL community by subscribing to mailing lists:

Also, don't forget to give us a ⭐ on Github