To lower the usage barrier for community users and enhance their experience, the IvorySQL community has launched the IvorySQL-WASM project, enabling users to quickly access online demos.
IvorySQL-WASM is developed based on the open-source Postgres-WASM framework. It allows users to experience IvorySQL directly in web browsers without local installations or complex deployments. By combining WebAssembly and virtualization technologies, IvorySQL-WASM provides a simple, lightweight, and accessible way for developers, testers, and database enthusiasts to effortlessly explore the powerful features of IvorySQL.
V86: An x86 emulator that simulates the hardware environment required for virtual operating systems, including CPU, memory, VGA, BIOS, and serial ports.
BuildRoot: Used to build a minimal Linux system image running on V86, integrated with IvorySQL 4.4 services and a stable runtime environment.
WebAssembly (WASM): A low-level, assembly-like binary instruction format. Tools like Emscripten compile C/C++ code into WASM modules, enabling the migration of existing C library ecosystems to the web platform. With its compact binary format and near-native performance, WASM serves as the core technology for running database services in the IvorySQL-WASM project.
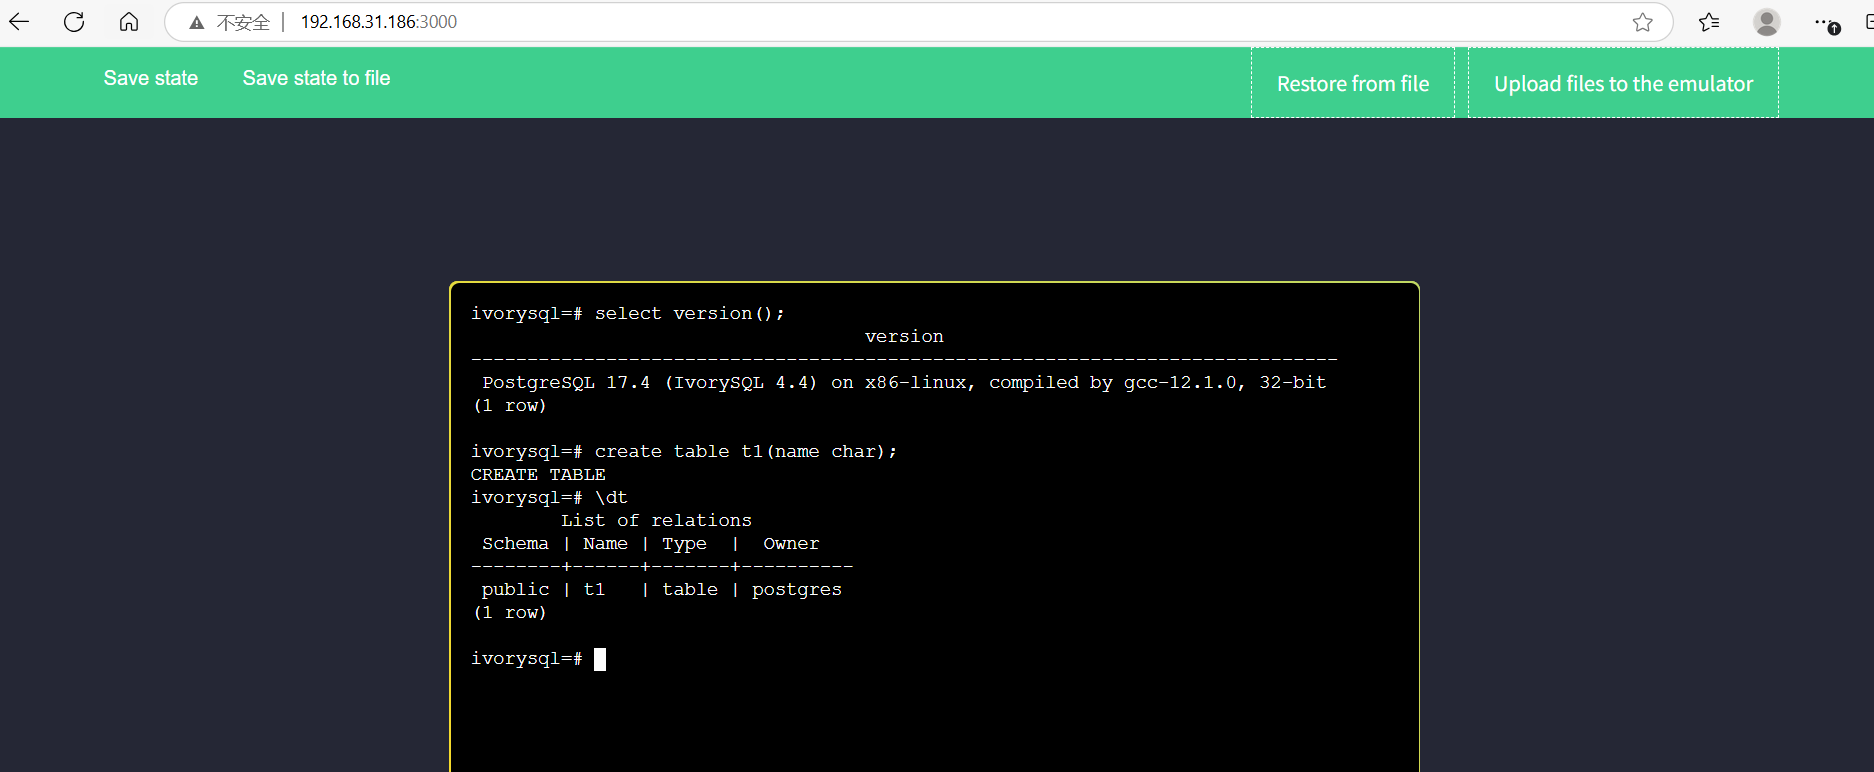
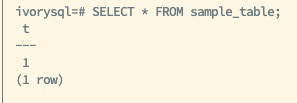
By accessing http://192.168.31.186:3000/, users can perform online IvorySQL operations, such as creating a t1 table and listing tables.
When running the minimal Linux virtual machine, the browser first downloads the system image files (~35MB) and state snapshot (15MB). Thus, the initial page load may take several seconds to over 20 seconds, depending on whether the HTTP server is hosted internally or externally. The state snapshot enables rapid loading of preconfigured databases.
Task Manager observations show that IvorySQL’s browser-based operation consumes CPU and memory resources efficiently.
Databases are stored in memory. Refreshing the page clears the database and restores the system to its initial state.
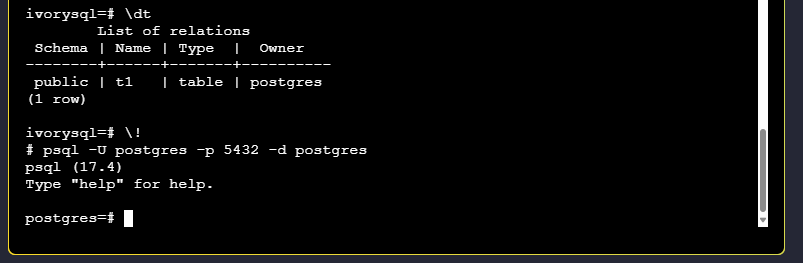
IvorySQL uses dual ports. The default connection port is 1521. To log in via port 5432, exit psql in the shell terminal and execute:
psql -U postgres -p 5432 -d postgres
To save the current database: Click "Save state to file". The browser will automatically generate and download a v86state.bin file. To reuse the saved database: Click "Restore from file" on the page and upload the v86state.bin file.
The V86 system has a minimum memory configuration of 128 MB (current setting).
Developers can modify the source code to meet specific needs.
For BuildRoot, refer to package/buildroot/README.md.
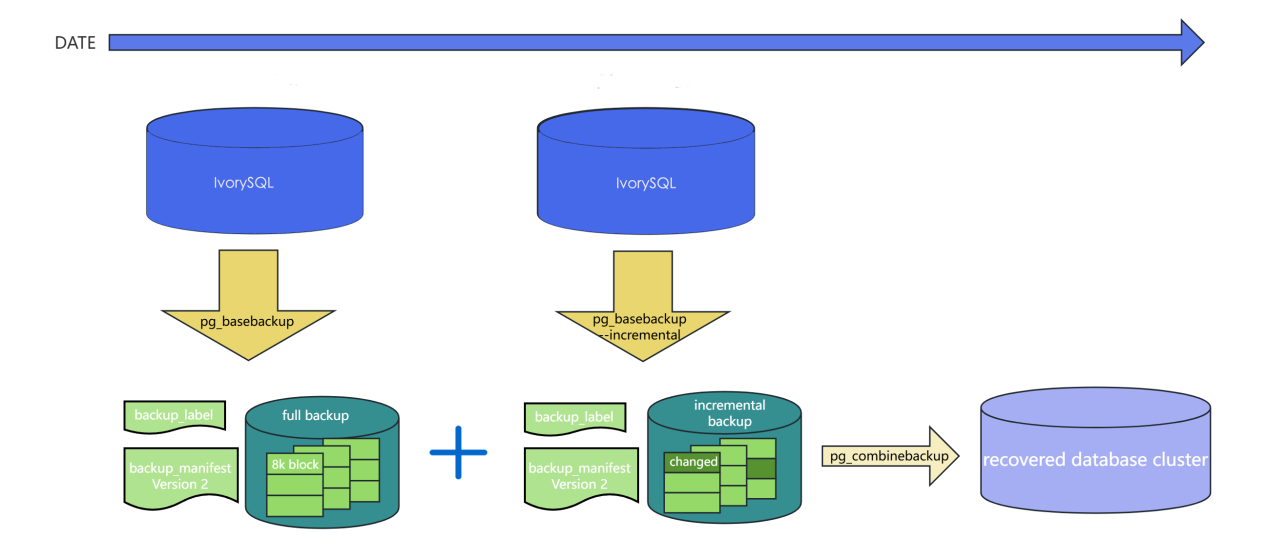
IvorySQL v4 introduces block-level incremental backup and incremental backup merge features aimed at optimizing the database backup and recovery process. By supporting incremental backups through the pg_basebackup tool, storage requirements and backup times are significantly reduced. Additionally, the pg_combinebackup tool can merge multiple incremental backups into a single full backup, enhancing the flexibility and efficiency of data recovery.
IvorySQL’s incremental backup works by recording data changes during each checkpoint cycle, ensuring that only the data blocks changed since the last backup are included. This mechanism not only reduces the required storage space but also shortens I/O operation times during the backup process. Furthermore, the pg_combinebackup tool supports merging multiple incremental backups into one full backup, eliminating the need to apply incremental backups one by one during data recovery, thus simplifying the recovery process.
To enable the incremental backup functionality, the relevant parameters must first be configured in the database, and the configuration file must be reloaded:
ALTER SYSTEM SET summarize_wal =ON; SELECT pg_reload_conf();
Then, create a test table and insert initial data for subsequent backup operations:
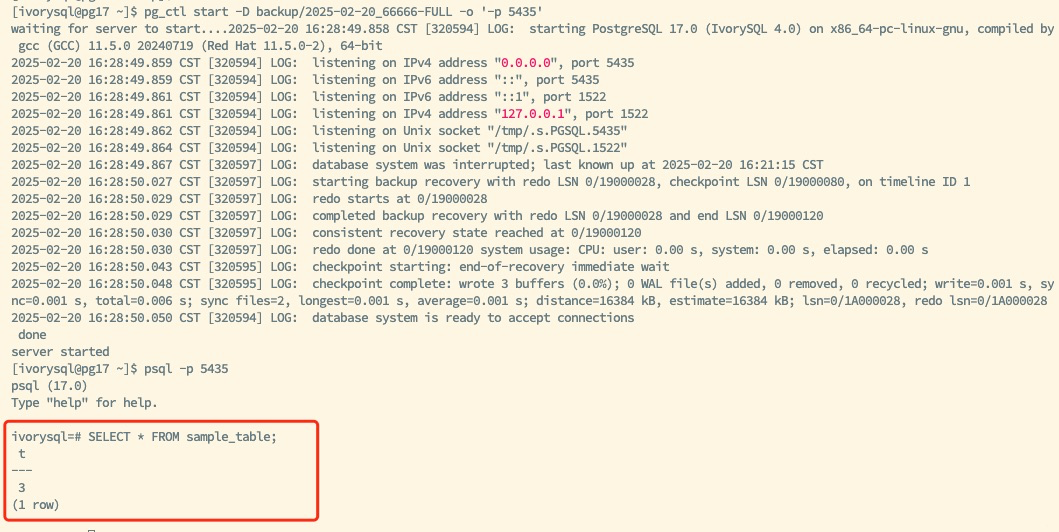
Use the pg_basebackup tool to perform a full backup and generate a backup file containing the backup_manifest for use as the base for future incremental backups:
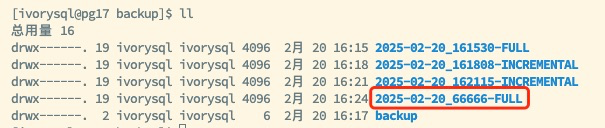
Merge the full backup and multiple incremental backups to create a new full backup for subsequent recovery operations:
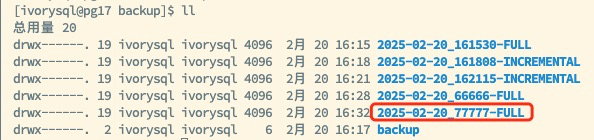
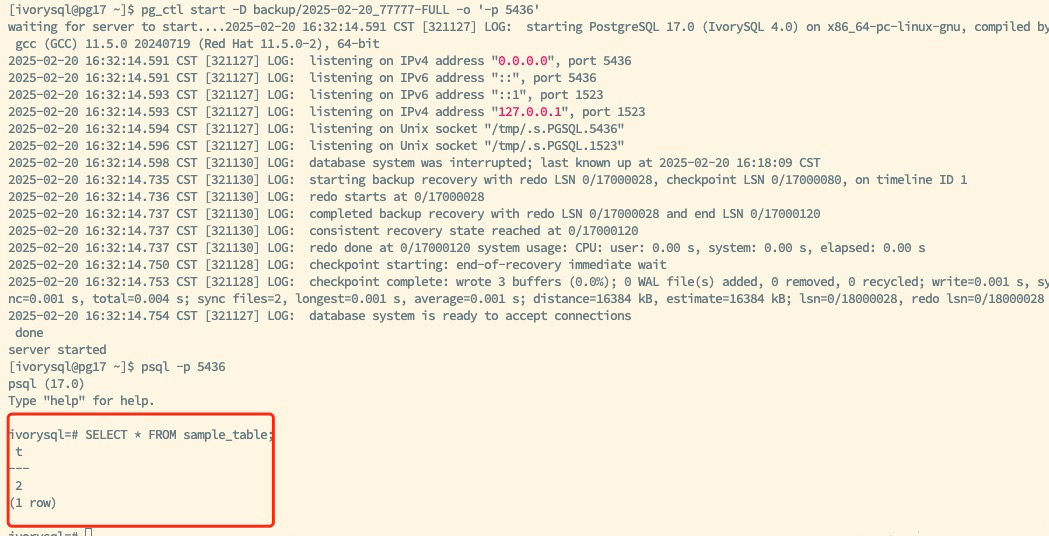
cd /backup
pg_combinebackup 2025-02-20_161530-FULL 2025-02-20_161808-INCREMENTAL 2025-02-20_162115-INCREMENTAL -o 2025-02-20_66666-FULL
Note: The full backup must be listed first in the parameter list, and the incremental backups should be ordered chronologically to ensure data recovery integrity and consistency.
Ensure that the full backup is listed first in the merge command, with incremental backups ordered chronologically to avoid data inconsistency during the merge process.
While incremental backups reduce storage space requirements, recovery operations depend on the complete incremental backup chain. Any loss of an incremental backup will result in recovery failure. Therefore, it is recommended to regularly check and merge incremental backups to ensure the integrity and reliability of the backup chain.
Monitor the database performance when performing incremental backup and merge operations to ensure that the impact on system performance remains within acceptable limits, avoiding backup operations during peak load periods.
The block-level incremental backup and pg_combinebackup tool provided by IvorySQL significantly enhance the efficiency of database backup and recovery. By backing up only changed data blocks, incremental backups show excellent performance in reducing storage usage and shortening backup times. The incremental backup merge feature further simplifies the recovery process, making operations more convenient.
These advanced features make IvorySQL an ideal choice for large-scale databases and environments with strict data recovery requirements, offering flexible and efficient backup and recovery solutions to ensure data security and availability.
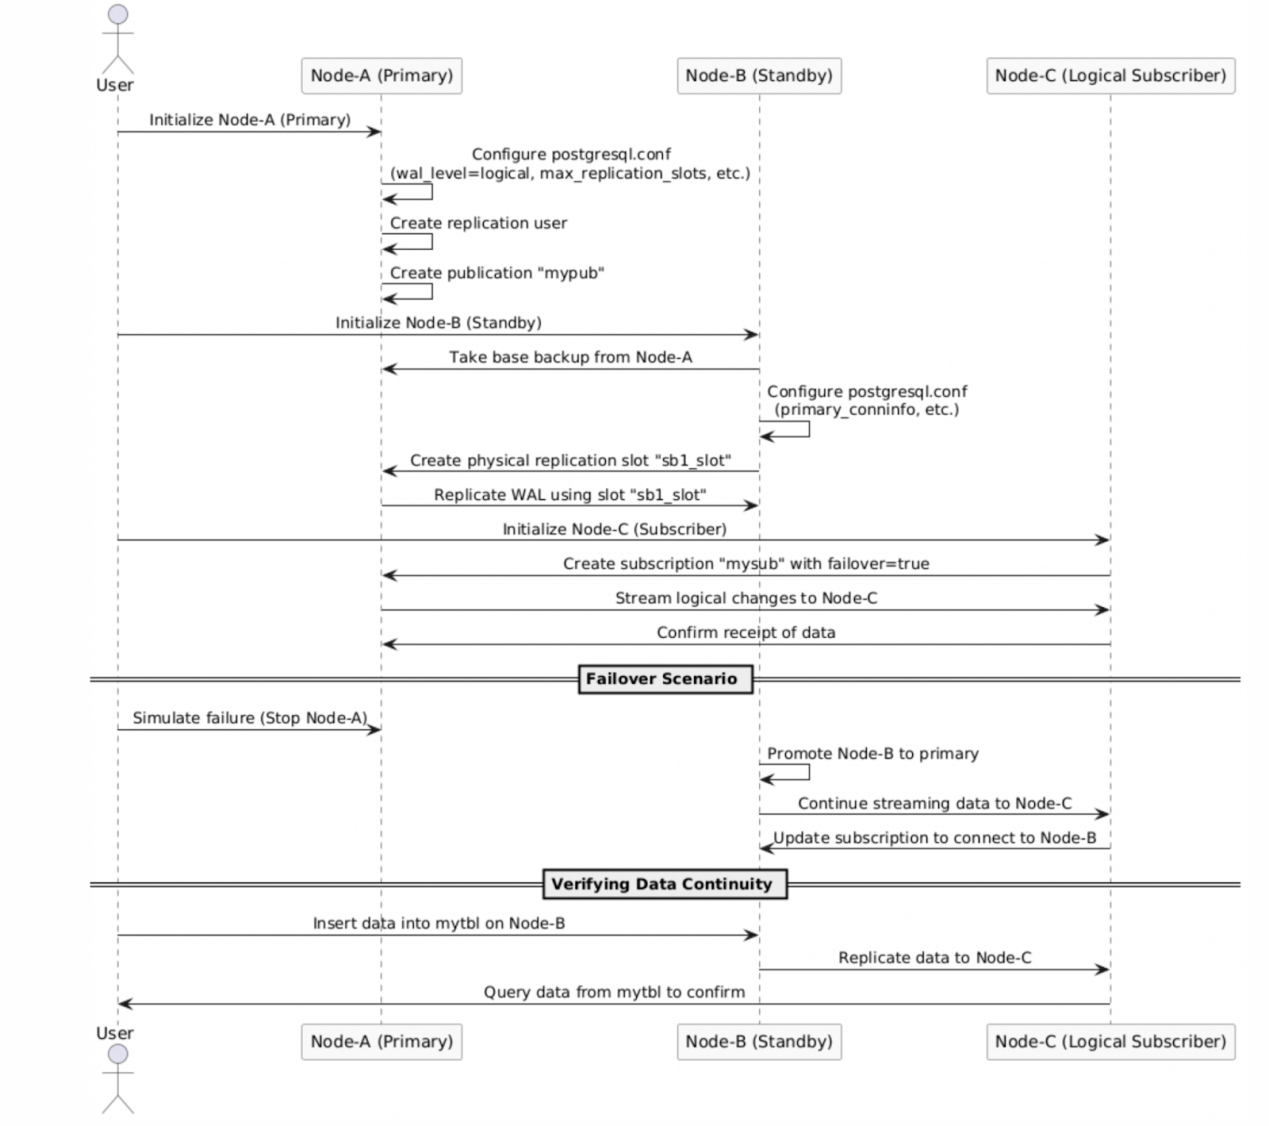
IvorySQL v4 is based on PostgreSQL 17 and introduces the capability of synchronizing logical replication slots to hot standby databases. This improvement effectively addresses the issue of logical replication interruption after switching from the primary database to the backup database in older versions. For databases that prioritize high data availability and business continuity, this is undoubtedly a significant advantage. It not only enhances the overall stability of the system but also ensures that the data replication process can continue seamlessly in the event of a failure, thereby minimizing the likelihood of business interruption.
Physical Replication Slot: There must be a physical replication slot between the primary database and the backup database, serving as the foundation for synchronizing logical replication slots and ensuring effective data transfer between them.
Configuration Parameters:
Configure the primary_slot_name parameter on the backup database and specify the replication slot when using the pg_basebackup tool. This configuration step ensures that the backup database can correctly receive data from the primary database.
Enable the hot_standby_feedback feature on the backup database to ensure it can receive and send back WAL logs. This feature guarantees the activity of the backup database during data reception and maintains the integrity of its feedback mechanism.
Specify a valid database name (dbname) in the primary_conninfo parameter. This configuration ensures that the target database for the replication process is clear and correct.
Recommended Configuration: Configure the standby_slot_names parameter on the primary database to maintain consistency in replication slot synchronization. This configuration helps maintain a consistent state of replication slots between the primary and backup databases, thereby enhancing the reliability of the replication process.
Creating Logical Replication Slots:
When calling the pg_create_logical_replication_slot function, set failover=true to specify the synchronization of the replication slot to the backup database. This setting is crucial as it determines the behavior of the replication slot during primary and standby switches.
Subscription Configuration:
When using the CREATE SUBSCRIPTION statement, specify failover=true to ensure the replication slot is synchronized to the backup database. This provides database administrators with flexible configuration options, allowing them to tailor replication strategies based on actual business needs and environmental characteristics.
Manual Synchronization:
Execute the pg_sync_replication_slots function on the backup database to manually synchronize the replication slots. This method offers an immediate synchronization mechanism, particularly suitable for scenarios requiring rapid reflection of changes from the primary database.
Automatic Synchronization:
Set the sync_replication_slots = on parameter on the backup database to achieve regular automatic synchronization without the need to restart the database. This automation simplifies database maintenance, allowing administrators to focus more on other critical tasks.
The following diagram illustrates the process of configuring and creating synchronized logical replication slots, detailing the steps to configure the basic parameters for synchronized logical replication slots and how to create one.
A new failover parameter has been added, with a default value of false. If set to true, it indicates that the replication slot needs to be synchronized to the backup database.
This function provides database administrators with finer control, making the management of logical replication slots more flexible and efficient.
pg_sync_replication_slots
This function is used to manually synchronize replication slots to the backup database.
Example syntax:
SELECT pg_sync_replication_slots()
Using this function allows for the instant synchronization of changes from the primary database to the backup database, ensuring data consistency and integrity.
sync_replication_slots
Setting this parameter to on on the backup database enables regular automatic synchronization of replication slot changes without restarting the database.
This automation significantly reduces the burden on database administrators, making the maintenance of replication slots easier and more efficient.
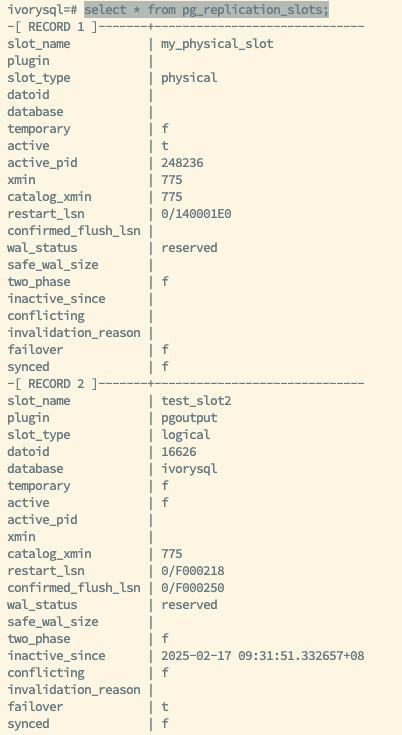
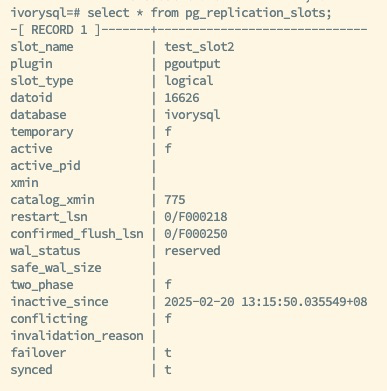
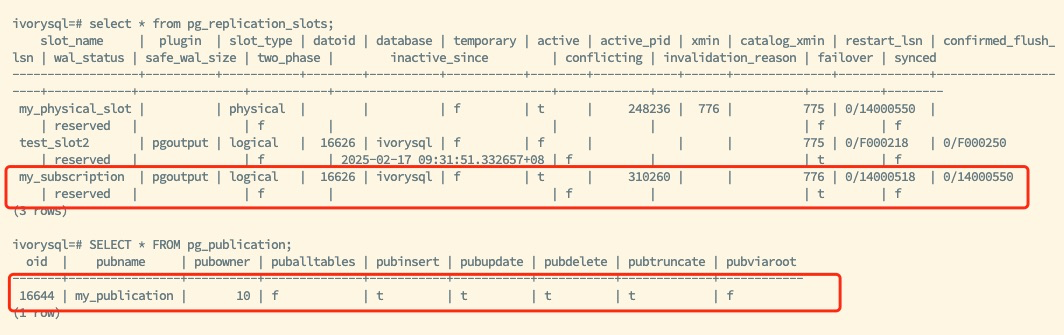
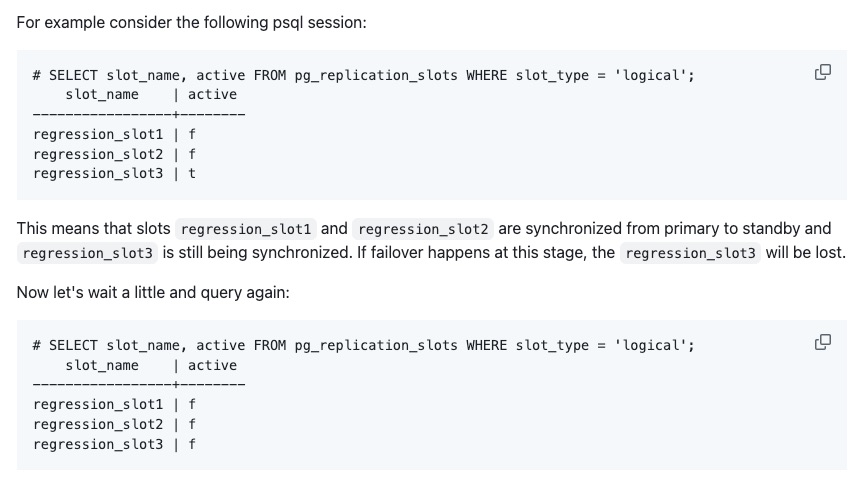
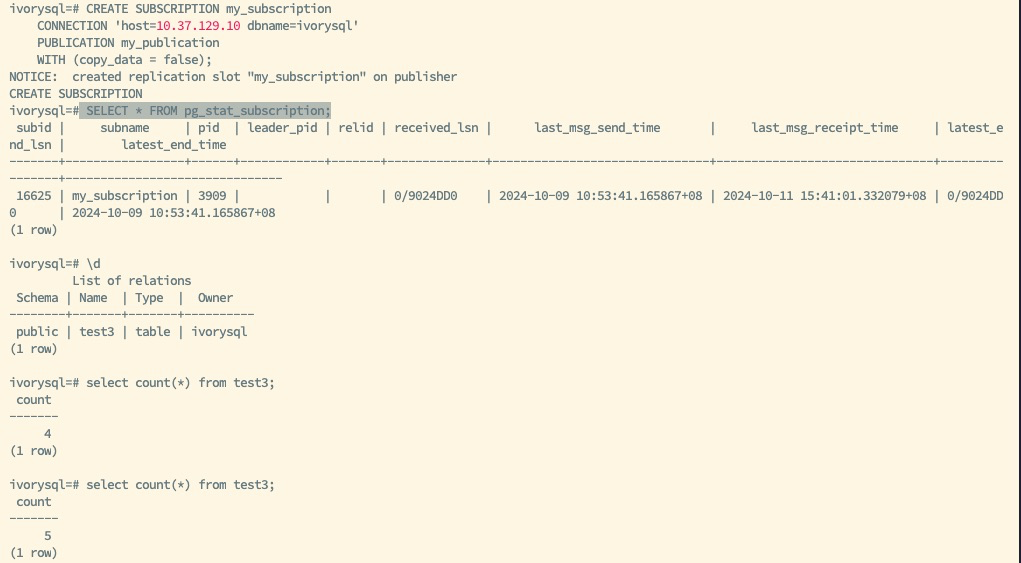
As shown in the figure above, the status of the replication slots for the primary and backup databases is displayed. The primary database has created the logical replication slot test_slots2 with the attribute failover set to true, enabling the failover functionality of this slot. Whether manually or automatically, the status and information of the logical replication slot test_slots2 can be synchronized to the backup database. When a switch occurs or a failover happens, and the backup is promoted to the new primary, the information of the logical replication slot test_slots2 will be retained, ensuring that the subscription side does not lose any data during the transition.
Set up the primary and backup database environments, ensuring correct configurations for both physical replication slots and streaming replication users. This process requires careful planning and execution to ensure the stability and reliability of the replication environment.
This operation is the starting point for synchronizing the logical replication slot, laying the foundation for subsequent data replication.
Manually Synchronize the Replication Slot on the Backup Database:
Execute:
SELECT pg_sync_replication_slots()
This operation ensures that changes to the replication slot are promptly reflected on the backup database, guaranteeing data synchronization and consistency.
Verify Replication Slot Synchronization:
Execute a query on the backup database to ensure the replication slot has been synchronized.
Execute:
SELECT*FROM pg_replication_slots
This verification step is crucial for confirming the successful synchronization of the replication slots, ensuring the correctness and completeness of the replication process.
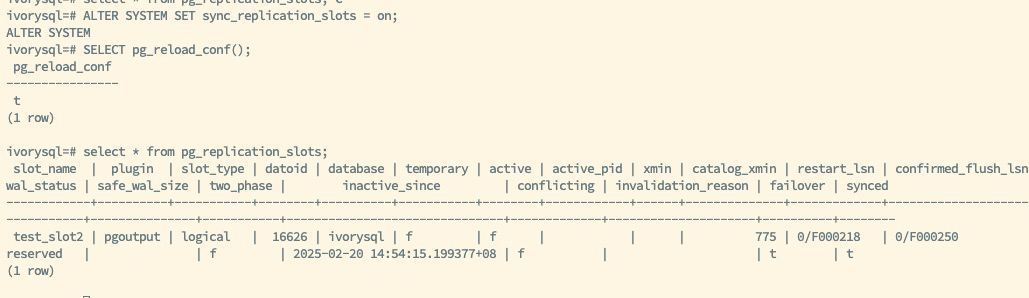
Set sync_replication_slots = on on the Backup Database:
Execute:
ALTER SYSTEM SET sync_replication_slots =on
Then execute:
SELECT pg_reload_conf()
This automation simplifies the synchronization tasks for replication slots, allowing administrators to complete synchronization without manual intervention.
Verify Automatic Synchronization:
Insert data into the primary database and observe changes in the backup database's replication slots to ensure that changes in the primary database are automatically synchronized to the backup database. This verification step is critical for confirming the proper functioning of the automatic synchronization feature, ensuring the automation and reliability of the replication process.
Simulating the Switch Between the Primary and Backup Databases
Perform the Primary Database Promotion on the Backup Database:
Simulate a primary database failure by shutting down the primary database.
Execute on the backup database:
pg_ctl -D data promote
This operation simulates an emergency switch in the event of a primary database failure, serving as an important step in testing the functionality of replication slot synchronization in real failure scenarios.
Continue Logical Replication on the New Primary Database:
Bind the VIP to the new primary database to ensure logical replication can continue. This operation ensures that logical replication can proceed seamlessly after the switch of the primary database, maintaining business continuity and data consistency.
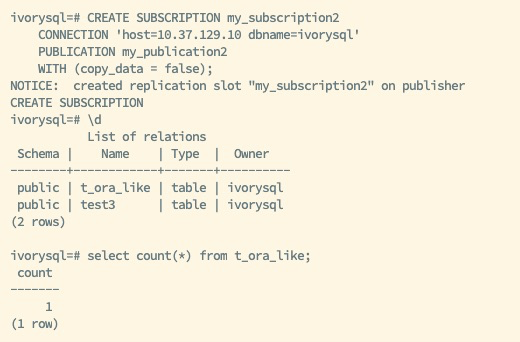
The above diagram shows the new primary after the switch, retaining the existing logical replication slot my_subscription and publication information my_publication. After configuring other necessary parameters, the logical replication slot synchronization capability of the new backup is restored.
The subscriber routes to the new primary database using the VIP, continuing to utilize the synchronized logical replication slot to ensure normal data replication.
The logical replication slot synchronization feature enhances the reliability of IvorySQL in high-availability environments, resolving the issue of logical replication slot loss after switching between the primary and backup databases. This feature ensures that information regarding logical replication slots is not lost during primary and standby switches, guaranteeing the continuity and consistency of the data replication process.
The synchronization process must meet the following conditions:
Replication slots with failover=true set;
Configuration of physical replication slots between the primary and backup databases;
Enabling hot_standby_feedback on the backup database;
Correct configuration of the database name in the primary_conninfo parameter on the backup database;
Recommended configuration of the standby_slot_names parameter to ensure consistency;
The backup database can manually or automatically synchronize replication slots through pg_sync_replication_slots or the sync_replication_slots parameter, ensuring seamless logical replication switching.
This series of measures and features collectively constitutes the power and flexibility of the logical replication slot synchronization functionality in IvorySQL, providing database administrators with robust tools to address various complex and challenging data replication scenarios.
With the diversification of database application scenarios, users have raised higher demands for data management flexibility and privacy. IvorySQL, an open-source database based on PostgreSQL and compatible with Oracle, has always been committed to staying ahead and innovating in terms of functionality. In the recently released version 4.0, IvorySQL introduced a new Oracle-compatible feature, Invisible Column, contributed by community member Imran Zaheer, demonstrating the power of open-source collaboration.
The introduction of Invisible Column provides developers with a new option to dynamically adjust the database structure without affecting existing applications. This further enhances IvorySQL's ability in data flexibility management, offering users greater convenience in areas such as database upgrades and compatibility optimization.
This article will provide a detailed introduction to the functionality, use cases, and usage of this feature.
In modern database development, column visibility management plays a significant role in affecting the flexibility and migration efficiency of applications. Oracle 12c introduced a powerful feature: Invisible Column. This feature allows columns to be hidden, enhancing data security and implementing business logic. It provides developers with flexibility and control, especially in scenarios such as application migration or version upgrades.
In Oracle, an Invisible Column refers to columns that are invisible to most SQL queries and tools. By setting a column as an invisible column:
It will not appear in the results of a regular SELECT * FROM query.
It will not be displayed in description operations in SQL*Plus or OCI.
It will not be included in record definitions based on the %ROWTYPE attribute.
However, invisible columns still exist in the table and can be accessed or referenced by explicitly specifying the column name. Additionally, there are restrictions when using invisible columns, as they cannot be used in external tables, cluster tables, or temporary tables.
Invisible columns are very useful in application migration processes. When adding new columns to an existing table, invisible columns can prevent the new columns from affecting the functionality of old applications. The old applications will not be aware of the new columns, while the new applications can explicitly reference them. This makes the online migration of applications smoother and simpler.
Certain sensitive data can be stored in invisible columns to prevent it from being accessed by most default query tools, thereby reducing the risk of accidental exposure.
During data model adjustments or debugging, some columns can be temporarily set as invisible to ensure they do not impact regular queries, thus avoiding confusion in query results.
The invisible column feature is a cleverly designed functionality that provides greater flexibility and security for database development and management. By effectively utilizing invisible columns, developers can easily handle complex application migration scenarios while maintaining system stability and scalability.
If you have a project that uses IvorySQL database, consider integrating this feature into your solution to enhance overall efficiency and reliability.
A package is a schema object that contains logically related PL/SQL types, variables, constants, subprograms, cursors, and exceptions. Packages are compiled and stored in the database, and multiple applications can share the contents of a package.
Every package has a package specification that declares public objects accessible outside the package.
If the public objects include cursors or subprograms, the package must also have a package body. The package body must define the code for the public cursors and subprograms. The body can also declare and define private objects, which cannot be referenced outside the package but can be used within the package. Lastly, the package body can include an initialization section, used for initializing variables, performing one-time setup steps, and handling exceptions. Modifying the package body does not require changes to the package specification or to database objects that reference the public objects of the package, so the package body can be considered a black box.
In terms of content, the package body is similar to a nested subprogram, and the package specification merely defines the external interface of the package body. Therefore, from an implementation perspective, the process of implementing a package can be similar to that of nested subprograms.
The main tasks we handle include the following: creating, updating, instantiating, deleting packages, and referencing package objects in external processes.
Creating a package: Modify the psql syntax so that psql can send the entire package creation statement to the server. The server will then add the package creation syntax. The syntax structure is similar to that of ordinary functions, so it is processed similarly, without requiring expansion at the SQL side. After syntax parsing, it follows the DDL process and calls the package creation function to store the package contents in the system tables.
Updating a package: Support update syntax on the SQL side. After syntax parsing, the package update function is called to update the system table contents. The plisql_package_Handler is invoked to parse the syntax and invalidate the package specification or body tuples, preventing package and body compilation at runtime.
Deleting a package: Support the delete syntax on the SQL side. After syntax parsing, the package delete function is called to delete the package content from the system tables.
Instantiating a package: The first time the package is referenced, if its contents are not in memory (specifically in a hash table, similar to the portal hash table storage), the instantiation function is called to reinstantiate the package. This process involves calling the PL/iSQL compile function to recompile both the package specification and body, storing the compiled result in the current process's memory. The instantiation of a package should load the entire package and body into memory.
Referencing package objects: During parsing, an interface is provided to search for variables, types, and subprograms in the package specification. It first looks for the package type within the current schema, then searches the system tables. When looking for subprograms, it prioritizes searching nested functions, packages, and system tables.
Package invalidation and state: If a package only contains constants and types, it is stateless. Otherwise, it is stateful. The state of the package is set when accessing its variables and functions. When the package is rebuilt, its local instance is invalidated and recompiled. For other processes' instances, if the package is stateful, accessing variables or types will result in a "state lost" error on the first access, after which normal access resumes.
Package instantiation, similar to function compilation, converts data defined as strings into structured data. A package consists of both a specification and a body, and its compilation requires some special handling. New functions are introduced to compile both the specification and the body and store the results in a hash table.
Additionally, to handle local cache invalidation during package and body deletion, an invalidation function is registered during cache creation, to clear the package's cache state when it is invalidated.
InvalidatePackageCacheCallback traverses the hash table using the hash value to update the corresponding package's cache state.
The package cache state is represented by a char, with three bits currently in use. 0x01 indicates that the package specification has been updated, 0x02 indicates whether the package has a body, and 0x04 indicates that the package body has been updated.
Interfaces are provided to search for functions, types, and variables within a package during the parsing phase. Below are some of the functions available:
Function Name
Parameters
Return Value
Description
LookupPkgTypeByTypename
Const List* names, Bool missing_ok
PkgType*
Searches for types within the package based on a list of names.
LookupPkgVarByvarnames
Const List _names, Bool missing_ok
PkgVar*
Searches for variables within the package based on names.
LookupPkgEntryByTypename
const List *names, bool missing_ok
PkgEntry
Returns attributes (types or variables) of a package based on name.
LookupPkgFunc
ParseState *pstate, List *fargs, FuncCall *fn
FuncExpr
Searches for functions within the package based on name.
When non-package functions in PL/iSQL use a package's type, they simply reference the type's address. When using variables, a local mapping is required, with special handling during assignments. Typically, this involves switching to the package's memory context and then calling the package's assignment function.
Function Parameters or Return Values Referencing Package Types
This part requires modifications to the pg_proc system table structure to add fields that record the names of parameter and return value types. Two new columns are added to the system table to solve this issue.
Similar to proargnames, a new protypenames field records the type names of parameter types, and rettypename records the return value type name. These fields are only populated when the corresponding type references a package; otherwise, they remain empty.
Since protypenames is a text array, it is populated when a function's parameter is of a package type. The type name for package items is serialized into a TypeName structure, and other non-package parameter types are represented as empty strings.
Support for the standard package under the sys schema is available, allowing users to access objects in the package specification without specifying the package name. Users can create their own standard packages.
This feature was introduced for compatibility with PostgreSQL's DISCARD functionality. Currently, PostgreSQL supports DISCARD SEQUENCE, DISCARD TEMP, DISCARD PLAN, and other commands to discard session-level objects such as sequences, temporary tables, and plans. The DISCARD ALL command also deletes temporary storage like portals, temporary tables, plans, and sequences.
IvorySQL supports the DISCARD PACKAGE syntax, which, when called within DISCARD ALL, deletes the session's package cache.
The design insights shared above outline the implementation of Oracle package compatibility.
By modularizing related functionality through packages, the database organizes procedures, functions, variables, and other programming elements into self-contained units, facilitating management and maintenance. Since implementation details are hidden in the package body, code security and maintainability are improved. Code in the package body is loaded into memory upon first invocation, allowing subsequent calls to access it directly, reducing parsing and loading time.
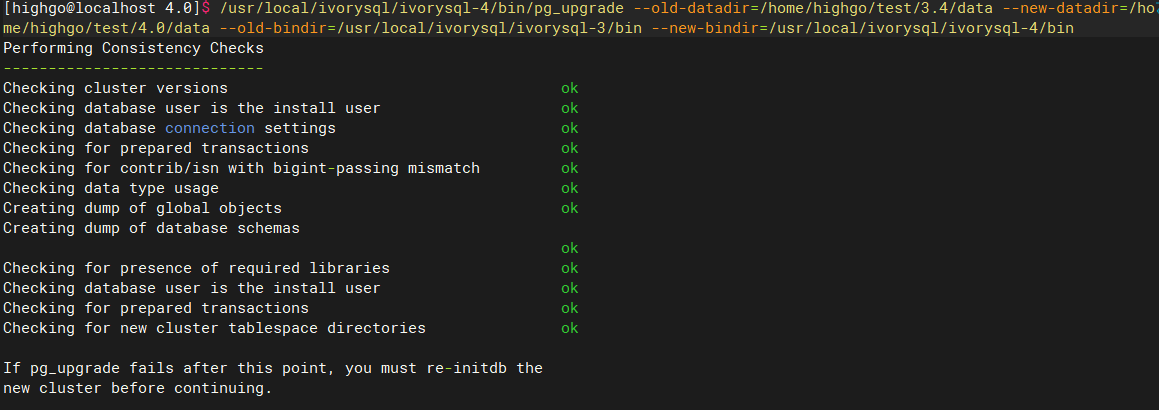
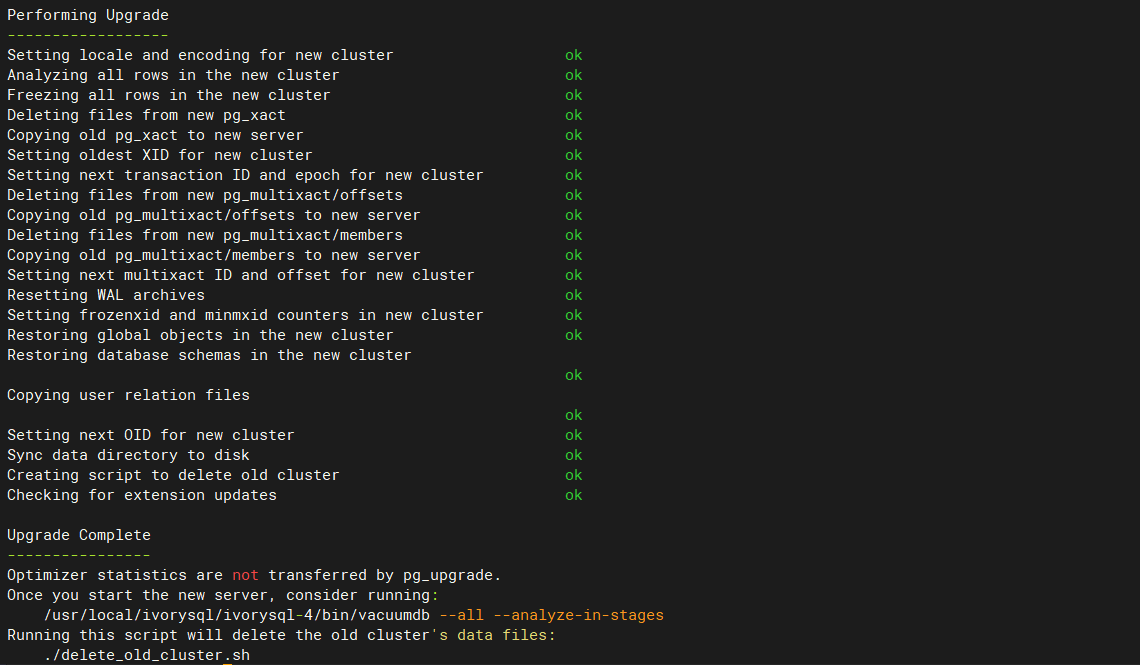
The pg_upgrade tool is a built-in PostgreSQL utility for cross-version upgrades, allowing for in-place upgrades of the database without the need for export and import operations. Since IvorySQL is derived from PostgreSQL, it can also use the pg_upgrade tool for major version upgrades.
pg_upgrade provides a compatibility check before the upgrade (-c or --check option) to identify issues such as plugin and data type incompatibilities. If the --link option is specified, the new version can directly use the original database files without copying, allowing the upgrade to be completed in just a few minutes.
Common parameters include:
-b bindir, --old-bindir=bindir: Path to the old IvorySQL executable directory
-B bindir, --new-bindir=bindir: Path to the new IvorySQL executable directory
-d configdir, --old-datadir=configdir: Path to the old data directory
-D configdir, --new-datadir=configdir: Path to the new data directory
-c, --check: Perform only a compatibility check without making any changes to data
-k, --link: Upgrade using hard links
Next, we will explain how to use pg_upgrade to upgrade IvorySQL to the latest 4.0 version on the CentOS 8 platform.
First, stop the old version of the IvorySQL 3.4 database:
Then, install the new version of the IvorySQL 4.0 database:
Initialize the new IvorySQL 4.0 data directory:
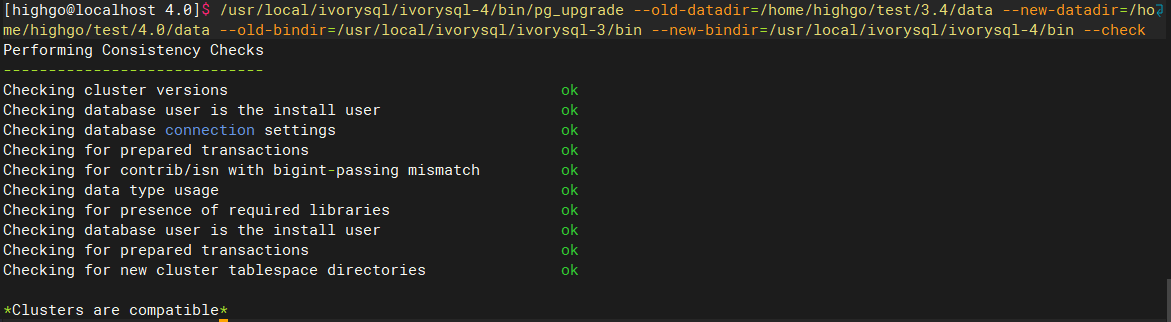
Check version compatibility:
Finally, if Clusters are compatible appears, it indicates that there are no compatibility issues between the two versions, and the upgrade can proceed.
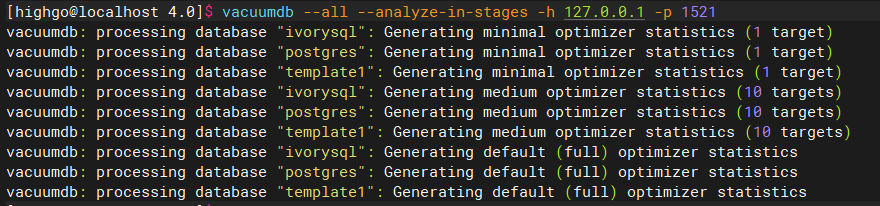
pg_upgrade will create new system tables and reuse old data for the upgrade, but the statistics are not migrated during the upgrade process. Therefore, before enabling the new version, you should first re-gather statistics to avoid incorrect query plans due to missing statistics.
After confirming there are no issues, delete the old database:
With this, we have completed the entire upgrade process.
If you encounter any issues during the upgrade process, feel free to submit an issue on GitHub, and we will assist you promptly. Additionally, if you have any ideas or expectations for future IvorySQL features, you can also submit an issue to provide feedback.
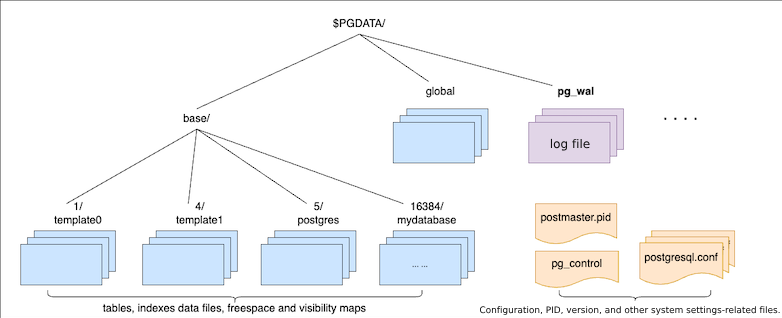
In general, a database storage system is divided into two parts: memory and external storage. Except for in-memory databases, data is eventually persisted, which means that it needs to be written from the memory buffer to the external storage. This article will discuss the external storage manager in IvorySQL.
The storage manager used by IvorySQL is essentially the same as PostgreSQL. Its directory and file structure are shown in the following diagram:
From a storage perspective, file management is divided into three main parts:
Configuration-related files, such as pg_control, postgresql.conf, pg_hba.conf, PG_VERSION, etc.;
WAL log files, such as 000000010000000000000001, 000000010000000000000002, etc.;
Data record files for tables and indexes, and corresponding remaining space and visibility mapping files.
Configuration-related files in PostgreSQL are handled with standard file read/write functions, for example, the pg_control file, which records the database state and operations. The background module reads and writes using ReadControlFile(), WriteControlFile(), and UpdateControlFile(). Front-end tools use get_controlfile() and update_controlfile() for reading and writing. Whether front-end or back-end, these read/write operations ultimately use standard file functions like open(), read(), and write(). These direct operations on configuration files are not within the scope of SMGR management.
WAL log files are read and written similarly to configuration files using standard file functions such as read(), write(), etc. However, file names need to be dynamically calculated based on the LSN.
Table and index data records are stored in the subdirectories of the corresponding database under the base directory. Changes to cluster-level catalog (system table) data records are reflected in the global directory. The management of system tables is similar to user tables, using the OID naming convention.
Process of SQL Statements Accessing Storage Media
An SQL statement typically accesses data records on disk through the following steps:
First, the statement goes through 5 stages of query processing: parse, rewrite, analyze, plan, and execute.
Then, it enters the Table/Index Access Method layer.
The Access Method layer typically uses the Buffer Manager service to operate on data entries, deciding whether to mark data blocks as "dirty" based on the operation.
The Buffer Manager layer calls the Storage Manager service, using the buffer tag to invoke smgr_read() or smgr_write() to read or write data to the storage media.
PostgreSQL originally had many implementations of the SMGR API interfaces, but currently, only the implementation for Magnetic Disk (md.c) remains. In fact, the disk manager can support any type of device as long as the operating system provides a standard file system interface for the device. However, the storage manager (smgr.c) layer is kept as an intermediate layer in case other types of storage managers are introduced. Removing this intermediate layer would not save significant overhead, as operations on storage media are much more expensive than a single C function call. f_smgr is a structure of function pointers that contains the functions required by PostgreSQL for storage. smgr.c defines wrapper functions for all function interfaces, and these wrappers eventually call the actual registered implementation functions, i.e., mdXXXX functions.
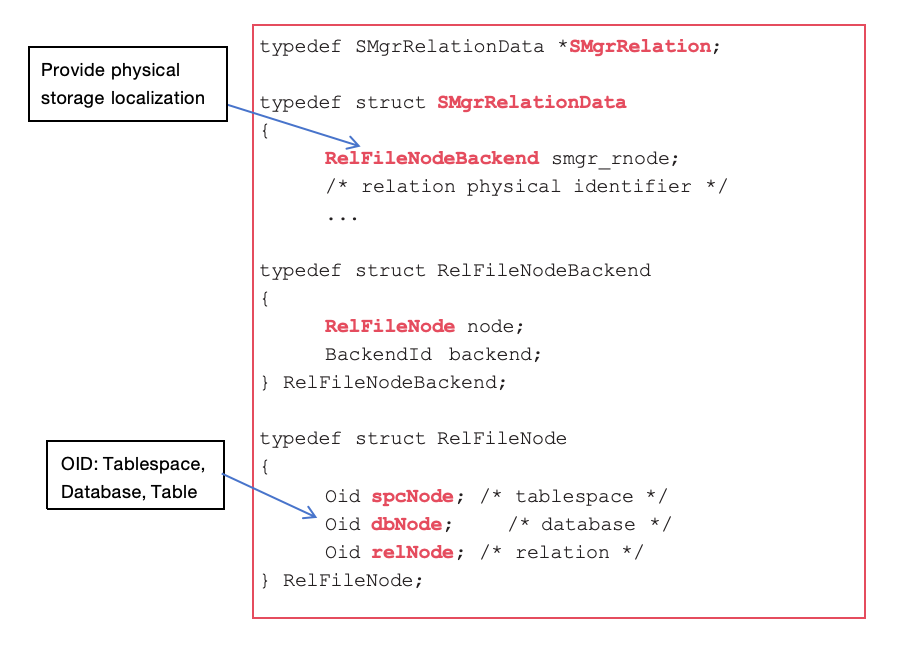
Smgrread(): Locates an 8K data block based on 5 parameters: tablespace, database, relation, forknum, and blocknum, and reads it into the specified memory.
Smgrwrite(): Locates an 8K data block based on 5 parameters and then overwrites it with the values from the specified memory. The skipFsync parameter determines whether to ensure data is successfully flushed to disk before returning.
smgrclose: Responsible for deleting the specified SMgrRelation object from the hash table.
smgrclose(SMgrRelation reln)
smgrtruncate: Deletes a specified number of 8K data blocks from the file (data, remaining space, visibility) from the end of the file, potentially removing multiple data blocks from the three fork files to reduce the file size.
smgrtruncate(SMgrRelation reln, ForkNumber *forknum, int nforks, BlockNumber *nblocks)
smgrprefetch: Uses POSIX_FADV_WILLNEED to request the operating system to pre-fetch disk data blocks into the cache, helping to avoid disk I/O bottlenecks.
smgrwrite and smgrextend are crucial functions for writing to disk and key to system I/O performance. They are called in the following scenarios:
smgrwrite:
When a Buffer is modified, smgrwrite is called to write the data to the corresponding file on disk.
When a transaction commits, it is necessary to ensure that all dirty data is written back to disk, requiring smgrwrite.
During the VACUUM operation, when the visibility information of a table is updated, the corresponding buffer may become dirty, requiring smgrwrite to write it to disk.
smgrextend:
When a file (table or index) needs to be extended, smgrextend is called to expand the file to the required size.
When creating a new table or index, its initial size is determined, and smgrextend is called.
When performing the CLUSTER operation, which reorganizes a table, smgrextend may also be called.
smgrwrite and smgrextend ensure data persistence, with smgrwrite being used to write modified data to disk, while smgrextend is used to expand the file size.
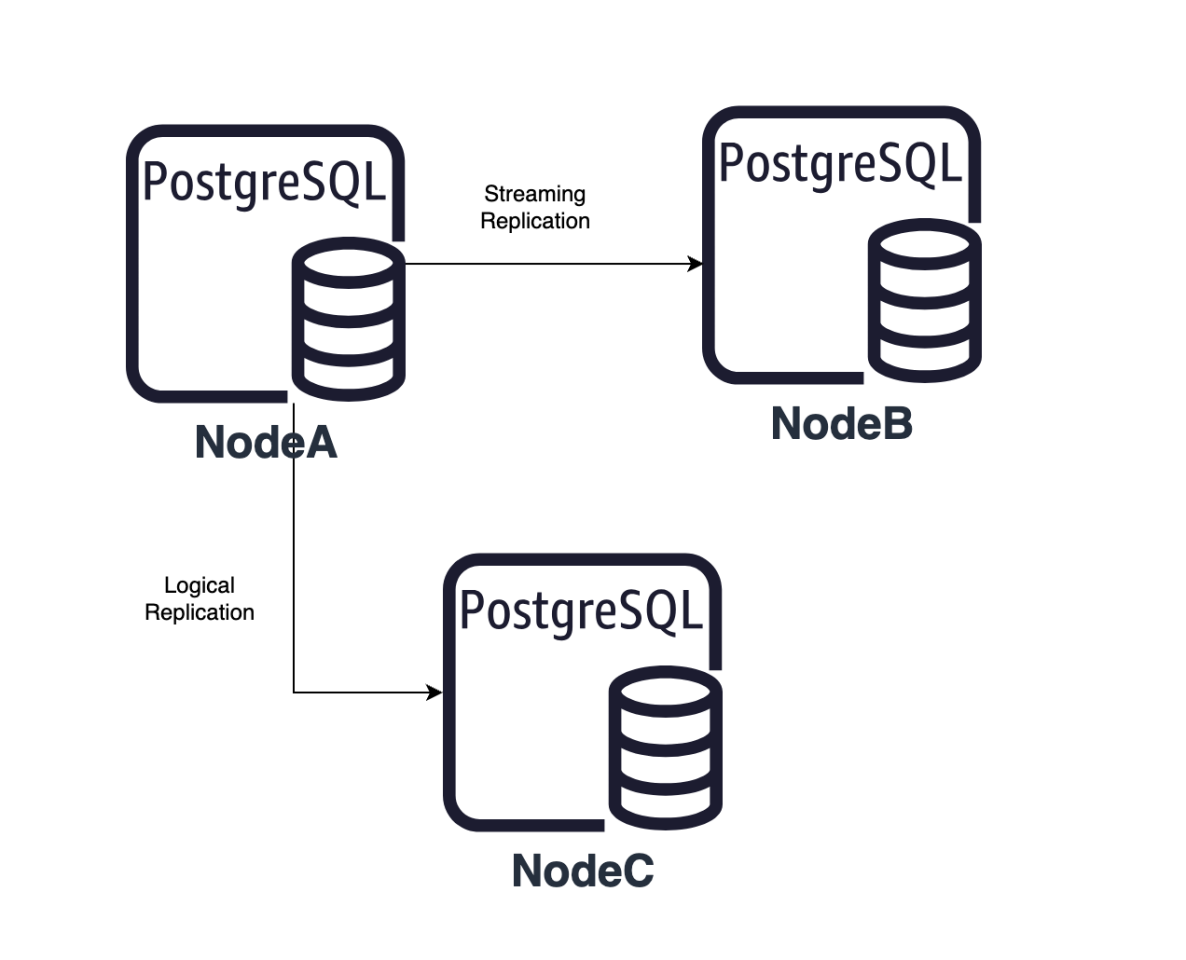
In a database high-availability architecture, logical replication is one of the key mechanisms for data synchronization and scaling. With logical replication, database administrators can selectively replicate data from specific tables, rather than replicating the entire database instance as in physical replication. However, the limitation of logical replication slots is that they only exist on the primary node, meaning after a failover, the new primary node cannot continue sending data changes to downstream systems until the logical replication slot is recreated or manually restored. This situation may cause data loss or require manual intervention from the administrator, impacting business continuity.
PostgreSQL, as an excellent open-source relational database, provides various high availability tools, among which the pg_failover_slot plugin specifically addresses the issue of logical replication slots not syncing during failover. IvorySQL, a PostgreSQL-based database that is Oracle-compatible, also supports this plugin.
This article will explain how to install and configure the pg_failover_slot plugin and how it helps IvorySQL achieve seamless logical replication slot synchronization.
The Principles and Limitations of Logical Replication Slots
In PostgreSQL, logical replication is different from physical replication. It allows for row-level fine-grained control over data changes in specific tables and can synchronize data across different database versions and architectures. The key to logical replication is the logical replication slot, which records and maintains data changes on the primary node, and these changes can be captured and applied by downstream subscribers.
Logical replication slots are a buffering mechanism that PostgreSQL uses to track data changes. They store incremental data changes since the last transmission until the downstream subscriber successfully receives this data. The replication slot also records the last change received by the downstream subscriber, allowing incomplete data to be resent in the event of system failures or network issues.
Since logical replication slots are maintained only on the primary node, the following issues can occur:
Data loss after failover: When the primary node fails and the standby node is promoted to primary, the new primary node does not have the replication slot's records. At this point, subscribers cannot receive data changes from the new primary until the administrator manually creates a new replication slot on the new primary node.
Manual creation and reinitialization of logical replication slots: Manually creating replication slots is tedious and can cause data synchronization interruptions, possibly requiring the reinitialization of logical replication tables, adding extra load and complexity.
To address these challenges, the pg_failover_slot plugin can automatically synchronize logical replication slots between the primary and standby nodes, ensuring continuity of data during failover.
pg_failover_slot is a plugin developed specifically for PostgreSQL to solve the issue of logical replication slots not syncing between the primary and standby nodes. The plugin synchronizes logical replication slots between the primary and standby nodes, ensuring that when the standby node is promoted to primary, it can continue sending data changes to downstream subscribers without requiring the creation of a new slot or manual intervention.
Key features of the plugin include:
Automatic replication slot synchronization: pg_failover_slot synchronizes logical replication slots between the primary and standby nodes, ensuring the standby node has the corresponding slot records.
Simplified failover process: After a primary-standby switch, there's no need to manually create new logical replication slots, ensuring subscribers can immediately receive data changes from the new primary node.
High availability support: By synchronizing the slots, pg_failover_slot enhances the system's fault tolerance and availability, reducing the management burden during outages.
Installing and Configuring the pg_failover_slot Plugin
To use the pg_failover_slot plugin on IvorySQL, follow these steps.
Assuming you have already deployed IvorySQL in a production environment and configured the primary and standby node setup:
Primary node: primary_node
Standby node: standby_node
Ensure the IvorySQL primary-standby architecture is running correctly, and logical replication slots have been created. Use high availability tools to manage the failover process and VIP management for drift.
Next, add the pg_failover_slot plugin to shared_preload_libraries in the postgresql.conf file on both the primary and standby nodes. Also, set the wal_level to logical or higher:
Ensure the primary database has already created logical replication slots, as this is a prerequisite.
On the standby node, configure:
hot_standby_feedback = on
primary_slot_name = ‘slot_name’
This configuration ensures that the plugin is loaded when the database starts. After completing the configuration, restart the IvorySQL instances on both the primary and standby nodes:
pg_ctl restart -D $PGDATA
After a successful restart, you can see the pg_failover_slot worker child process in the process list, and running show shared_preload_libraries will show pg_failover_slots, indicating the plugin is active.
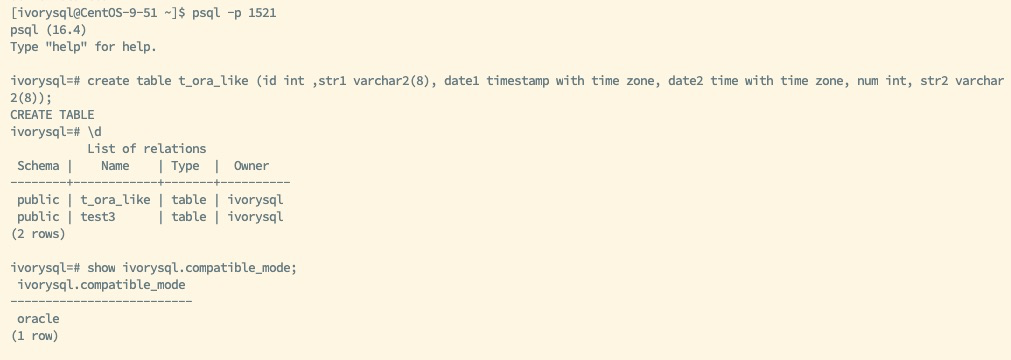
Connect to Oracle mode using port 1521, and create tables t_ora_like and test3 on the primary node with Oracle-compatible fields. The following shows the Oracle mode with Oracle attribute varchar2 fields in the t_ora_like table as a base test table, aiming to test the compatibility between the plugin and Oracle attributes.
Then create publications on the primary node:
CREATE PUBLICATION my_publication FOR TABLE test3;
CREATE PUBLICATION my_publication2 FOR TABLE t_ora_like;
At this point, when a subscriber subscribes to this publication via VIP, corresponding logical replication slots will be created. The pg_failover_slot plugin will automatically synchronize the replication slots to the standby node, and you do not need to manually create replication slots on the standby node.
Once the pg_failover_slot plugin is configured on both the primary and standby nodes, it will automatically manage the synchronization and failover of logical replication slots.
When a failure occurs on the primary node, use high availability tools to perform a failover. The standby node will be promoted to the new primary, and the VIP will drift to the new node. The pg_failover_slot plugin will ensure the new primary node takes over and recovers the logical replication slot.
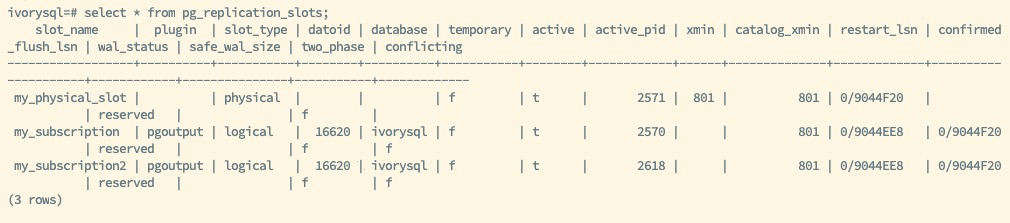
Check if the replication slot has been recovered on the new primary node:
SELECT * FROM pg_replication_slots;
The new primary node will already contain the logical replication slot that was previously created on the old primary. This means that downstream subscribers can continue receiving data changes from the new primary node, ensuring seamless logical replication.
Downstream subscribers do not need any additional action. They will automatically receive updates from the new primary node via VIP, without reconfiguring subscriptions.
When using the pg_failover_slot plugin, the following best practices can help you better manage and maintain the high availability of logical replication slots:
Configure replication slot limits properly: In high-concurrency or large-scale replication scenarios, ensure that the max_replication_slots parameter is configured appropriately. This parameter in IvorySQL's postgresql.conf file should be adjusted based on workload complexity to prevent replication slot overload.
Regularly monitor replication slot status: Use the pg_stat_replication_slots view to periodically check the status of replication slots, ensuring no delays or losses during synchronization between the primary and standby nodes. When used with high availability tools, automated failover can ensure seamless switching between primary and standby nodes and management of VIP drift. When pg_failover_slot is used alongside high availability tools, it ensures seamless takeover of replication slots during failover.
Performance optimization and monitoring: Logical replication can put pressure on system performance during high concurrency, so it is recommended to regularly monitor system I/O performance and CPU utilization. If necessary, optimize system configurations.
IvorySQL, together with the pg_failover_slot plugin, provides robust support for logical replication in high-availability environments. By automatically synchronizing logical replication slots between the primary and standby nodes, pg_failover_slot solves the problem of having to reinitialize replication slots after failover, significantly improving the stability and availability of logical replication.
For users who need seamless failover and wish to avoid data loss for downstream subscribers due to replication slot issues, pg_failover_slot is an essential tool. It simplifies the management of logical replication slots, reduces the complexity of database maintenance, and ensures data consistency in high-availability environments.
By following the steps outlined in this article, you can configure and use the pg_failover_slot plugin in IvorySQL to ensure your logical replication environment operates efficiently during primary-standby switches.
Grant Zhou, head of Highgo North America Research Institute, delivered the technical explanation of IvorySQL project at the meeting on May 26, 2022 Ottawa time.
This conference mainly introduces who we are, what IvorySQL is, IvorySQL key function points, community contribution guide, developer guide, etc. Based on PostgreSQL 14, IvorySQL adds some exciting features on top of PostgreSQL!
IvorySQL provides the following features based on PostgreSQL:
Oracle compatible Packages
Oracle compatible PL/iSQL procedural language
GUC to switch between Oracle and PostgreSQL modes
Oracle compatible syntax for various DDL operations
IvorySQL is an open source project. One of the core goals of this project is to deliver oracle
compatibility, So that one can use the oracle code on IvorySQL database server.
Providing Oracle compatibility on top of PostgreSQL is a multi-dimensional task. Ranging from providing the Oracle compatible SQL syntax to adding support for data types that are either missing or behaves differently in PostgreSQL. One of the main core of Oracle compatibility is to provide the compatible PL (procedural language) in PostgreSQL that is functionally and syntactical compatible with Oracle's PL/SQL. For that purpose IvorySQL has added a new PL language PL/iSQL that that accepts, understands and executes the PL/SQL syntax.
And as you know one of the core feature of Oracle's PL/SQL is the PACKAGES.
Package is a schema object in Oracle that contains definitions for a group of related functionalities and is one of the most widely used feature of Oracle.
So In this blog I will give a introduction of Packages followed by an example on how you can create, use, and destroy Oracle style packages with IvorySQL.
So what are packages? The Packages are grouping of PL/iSQL code, divided in logical program units. In other words
a package can be considered a collection of related functions, procedures, variables or cursors. This collection is
collectively be accessed via the common name.
IvorySQL has PL/iSQL language that accepts, understands and executes the PL/SQL code. The packages use this same language. The packages have two main components.
Package Specification
The package specification lists all the items that can be accessed from outside the package. such as functions, procedures, variables and cursors. This is also know as public specification.
Package Body
The Package Body contains the implementation of all functions and procedures that are listed in the package specification. In addition these, it can also implement more function and procedure or other elements.
These elements that are not in the package specification, will be treated private members of the package and these can only be referenced from within the package. The outside access is not permitted.
The package body can also have a special code block called initializer block. This is a special because this block is
executed only once per session, at the very beginning when the package is first accessed.
Let's see some example of the code and see how a package operates.
First let's set the compatibility mode, so we can access oracle compatible features available in the ivorysql database.
SET compatible_mode TO oracle;
CREATE TABLE books (
    id     INT,
    title  VARCHAR2(100),
    author VARCHAR2(100),
    price  NUMBER);
INSERT INTO books VALUES (10, 'The Hobbit', 'J. R. R. Tolkien', 10.0);
INSERT INTO books VALUES (11, 'Winnie-the-Pooh', 'A. A. Milne', 5.0);
INSERT INTO books VALUES (12, 'Peter Pan', 'James Matthew Barrie', 4.0);
INSERT INTO books VALUES (13, 'Charlie and the Chocolate Factory', 'Roald Dahl', 5.0);
INSERT INTO books VALUES (14, 'SThe Jungle Book', 'Rudyard Kipling', 9.0);
INSERT INTO books VALUES (15, 'The Little White Bird', 'James Matthew Barrie', 3.0);
Let's create a simple package. This package declares a cursor to list all available books. Have some subprograms to list, add and remove books. It also declares a some private variables to keep count and book information.
CREATE OR REPLACE PACKAGE mybooks AS
    CURSOR      booksinfo IS SELECT * from BOOKS;

    PROCEDURE list_books;
    FUNCTION add_book(title VARCHAR2(100), author VARCHAR2(100),
         price NUMBER) RETURN bool;
    PROCEDURE remove_book(book_title VARCHAR2(100));
END;
ivorysql$# /
CREATE PACKAGE
CREATE OR REPLACE PACKAGE BODY mybooks AS

    -- declare private variables
    bookinfo    booksinfo%rowtype;
    books_count INT;

    PROCEDURE list_books AS
    BEGIN
        OPEN booksinfo;
        RAISE INFO 'Book Info:';
        RAISE INFO '';
        LOOP
            FETCH booksinfo into bookinfo;
            EXIT WHEN NOT FOUND;

            RAISE INFO '  Name    = %', bookinfo.title;
            RAISE INFO '  Author  = %', bookinfo.author;
            RAISE INFO '  Price   = %', bookinfo.price;
            RAISE INFO '------------------------------';
        END LOOP;
        RAISE INFO 'Total Books   = %', books_count;
        CLOSE booksinfo;
    END;

    FUNCTION add_book(title VARCHAR2(100), author VARCHAR2(100),
        price NUMBER) RETURN bool AS
    BEGIN
        INSERT INTO BOOKS VALUES (
            books_count + 1,
            title,
            author,
            price);

        books_count := books_count + 1;
        RETURN true;

        EXCEPTION WHEN OTHERS THEN
            RETURN false;
    END;

    PROCEDURE remove_book(book_title VARCHAR2(100)) AS
    BEGIN
        DELETE FROM BOOKS WHERE title = book_title;

        EXCEPTION WHEN OTHERS THEN
            RAISE INFO 'Book % not found', book_title;
    END;

-- initializer block
BEGIN
    books_count := 0;
    SELECT count(*) INTO books_count
        FROM BOOKS;
END;
ivorysql$# /
CREATE PACKAGE BODY
Let checkout the count. This anonymous block tries to access the private members of the package, which should result in error.
ivorysql=# DECLARE
ivorysql$#   nbooks int := 0;
ivorysql$# BEGIN
ivorysql$#     nbooks := mybooks.books_count;
ivorysql$#     RAISE INFO 'Total Books   = %', nbooks;
ivorysql$# END;
ivorysql$# /
2022-05-26 16:35:32.328 PKT [63554] ERROR:  package private variable ("mybooks.books_count") is not accessible
Let's list all available books using the subprogram list_books of the package mybooks.
ivorysql=# BEGIN
ivorysql$#     mybooks.list_books;
ivorysql$# END;
ivorysql$# /
INFO:  Book Info:
INFO:
INFO:    Name    = The Hobbit
INFO:    Author  = J. R. R. Tolkien
INFO:    Price   = 10
INFO:  ------------------------------
INFO:    Name    = Winnie-the-Pooh
INFO:    Author  = A. A. Milne
INFO:    Price   = 3
....
....
INFO:  Total Books   = 6
DO
ivorysql=#
Let's add a new book using the subprogram add_book of the package mybooks.
DECLARE
  added bool;
BEGIN
    added := mybooks.add_book('The Cat in the Hat', 'Dr. Seuss', 10);
    IF added = TRUE THEN
        RAISE INFO 'new book added';
    END IF;
END;
/
CREATE OR REPLACE PACKAGE pkg_invrights AUTHID CURRENT_USER AS
    PROCEDURE curr_user;
END;
/

CREATE OR REPLACE PACKAGE BODY pkg_invrights AS
    PROCEDURE curr_user AS
    BEGIN
        RAISE INFO 'Current User: %', current_user;
    END;
END;
/
-- Create a Package with DEFINER rights
CREATE OR REPLACE PACKAGE pkg_defrights AUTHID DEFINER AS
    PROCEDURE curr_user;
END;
/

CREATE OR REPLACE PACKAGE BODY pkg_defrights AS
    PROCEDURE curr_user AS
    BEGIN
        RAISE INFO 'Current User: %', current_user;
    END;
END;
/
Let's see the package with invoker rights first.
ivorysql=> CALL pkg_invrights.curr_user;
INFO:  Current User: ivorysql
CALL
Let's see the package with definer rights.
ivorysql=> CALL pkg_defrights.curr_user;
INFO:  Current User: ivorysql
CALL
Let's switch to another user named ivuser
ivorysql=> \c ivorysql ivuser;
You are now connected to database "ivorysql" as user "ivuser".
Let's see the package with invoker rights first.
ivorysql=> CALL pkg_invrights.curr_user;
INFO:  Current User: ivuser
CALL
Let's see the package with definer rights.
ivorysql=> CALL pkg_defrights.curr_user;
INFO:  Current User: ivorysql
CALL
As shown above when the package with invoker rights (pkg_invrights) is called, it's using the privileges of the user that invoked the package. However, when a definer package (pkg_defrights) is called, it still uses the privileges of the package owner.